The VUE Video Doorbell is a Wi-Fi and PoE-enabled doorbell capable of recording and storing video clips.
The doorbell supports a hybrid storage system, using on-board SD card storage for local recording and cloud upload for remote backup and retrieval.
The doorbell is activated on Dealer Admin. Once activated, you can configure doorbell settings like chime, microphone, and detection analytics on Dealer Admin and Virtual Keypad. Video clips are viewable on Virtual Keypad.
For more information about installing the doorbell, refer to the VUE Video Doorbell Installation Guide.
Complete the following steps to setup the VUE Video Doorbell:
Step 1: Enable Video Doorbell Features
-
Log in to Dealer Admin (dealer.securecomwireless.com).
-
Go to Customers and select the System Name you want the doorbell to be associated with.
-
At the top of the screen, select Edit.
-
Scroll down to Virtual Keypad (App & Website) and ensure the Standard or Virtual Keypad Access plan is selected.
%20plans.png?cb=d933edd96fbbd1947f35f7702df29955)
-
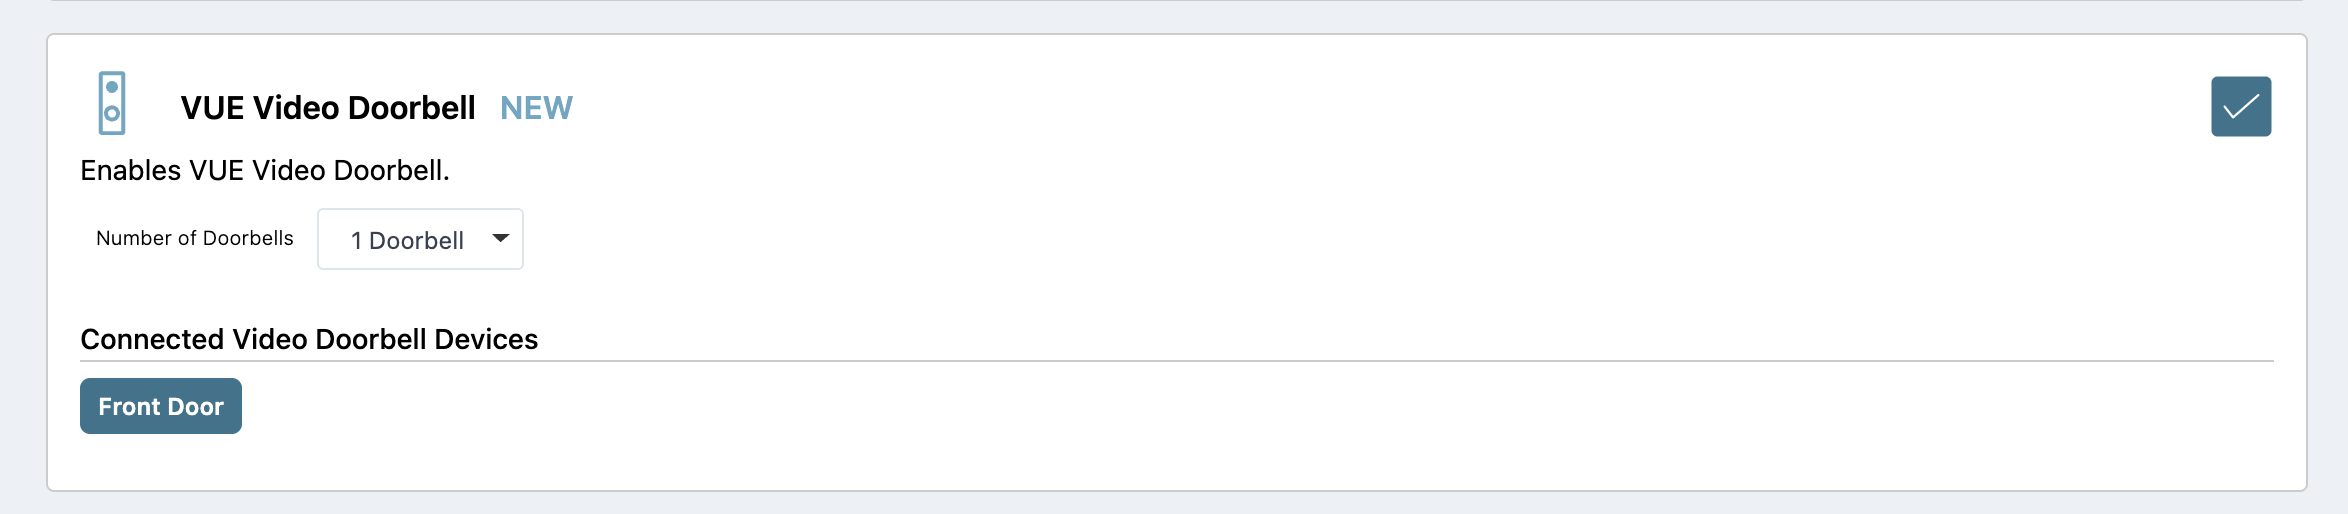
Scroll down to Video. At VUE Video Doorbell, select the checkbox to enable video doorbell features.
-
In the Number of Doorbells drop-down menu, select how many doorbells you want to add to the system. You can add up to 8 doorbells per system.
-
Select Save at the top or bottom of the screen.
Step 2: Activate the Video Doorbell
If your doorbell was powering using AC Power, go to Option 1: Wi-Fi (AC Power Connection) and complete the steps. If your doorbell is powered using PoE, go to Option 2: Hardwired (PoE Connection) option and complete the steps.
Option 1: Wi-Fi (AC Power Connection)
Note: Ensure that you know the Wi-Fi network and password that you wish to connect the doorbell to and that the network provides a 2.4 GHz or 5.0 GHz Wi-Fi signal.
If the doorbell is already mounted, complete the following steps to remove the doorbell from the backplate. If the doorbell is not mounted, skip to Step 3.
-
Use a SIM ejector tool or paper clip and insert the rounded end in the pinhole insert. The doorbell releases from the mounted backplate.
-
Lift and pull the doorbell to remove it from the backplate.
-
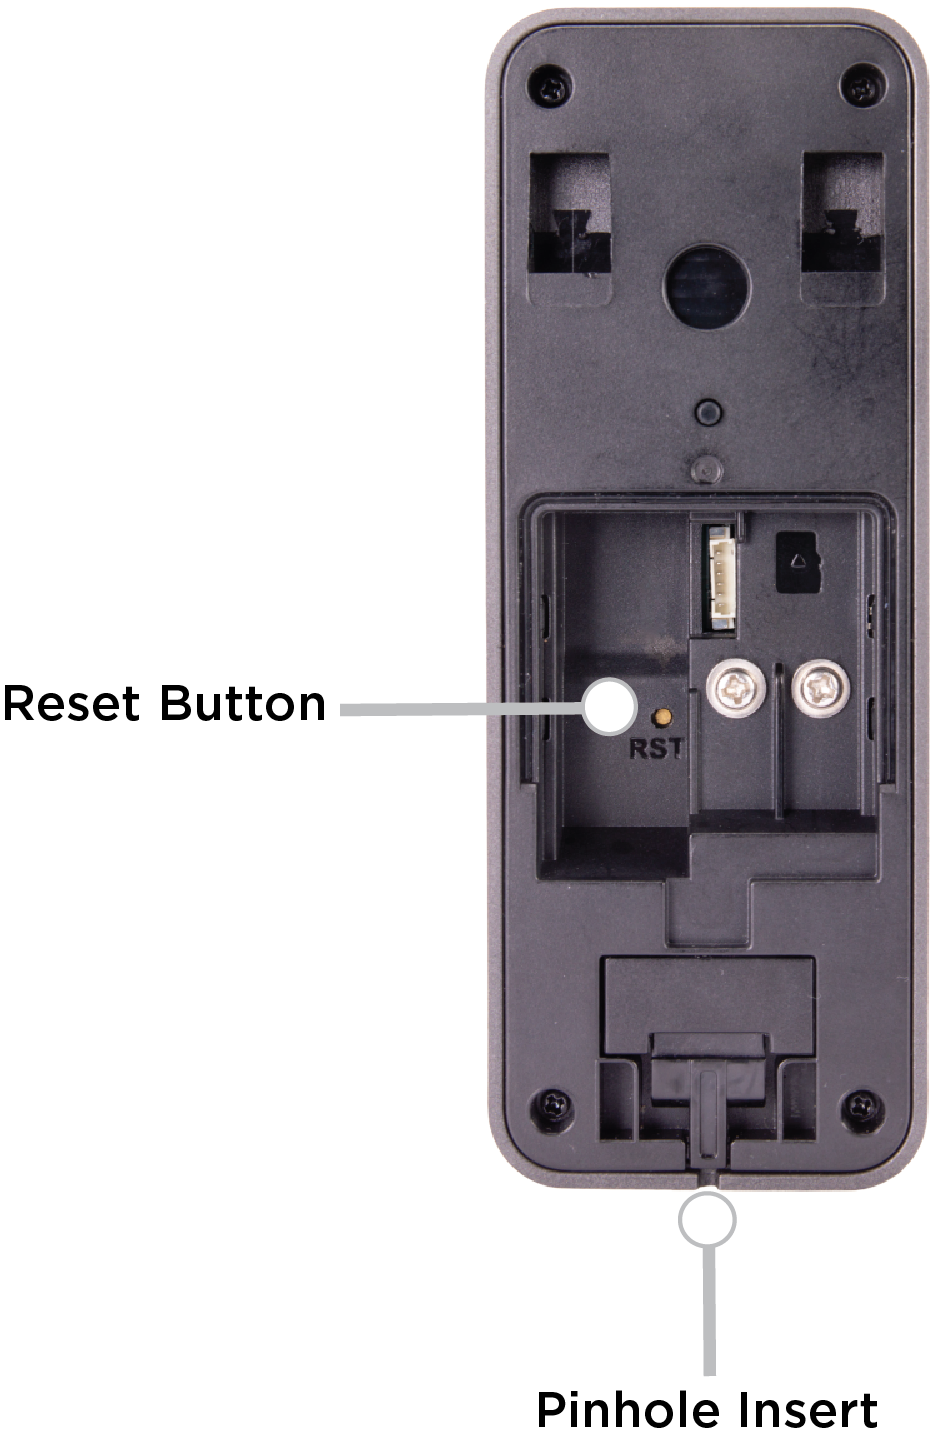
Remove the back tab from the doorbell, then locate the RST button on the back of the doorbell.
-
Use the straight end of the SIM ejector tool or paper clip and press the RST button for five seconds. This only resets the doorbell’s network settings. When the doorbell is ready to connect, the LED flashes red quickly and the doorbell plays the following message: “Please scan the Wi-Fi QR Code with the doorbell camera.”
Note: Pressing the RST button for 15 seconds resets the doorbell to its factory default settings. Ensure you only press the RST button for five seconds to reset the network settings.
-
Log in to Dealer Admin (dealer.securecomwireless.com).
-
Go to Customers and select the System Name the doorbell is associated with.
-
At Video, go to Video Doorbells and select + Doorbell.

-
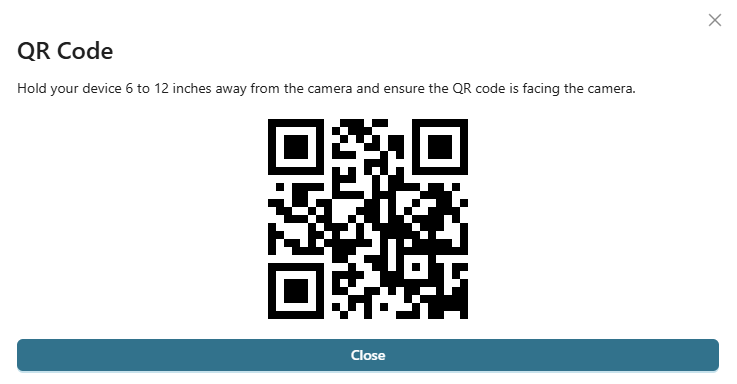
Select Wi-Fi, then enter the Wi-Fi network’s SSID and Passphrase. Select Next. A QR code displays.
.png?cb=6aeff6a63a3942a9f1f79c2ba8473b2f)
-
Hold QR code 6-12 inches away from the camera lens until the LED flashes blue.
-
When the doorbell is successfully connected, it plays the following message: “Wi-Fi connected successfully.” Select Next.
Note: If the doorbell does not connect to Wi-Fi, it plays the following message: “Wi-Fi pairing failed. Please try again.”
-
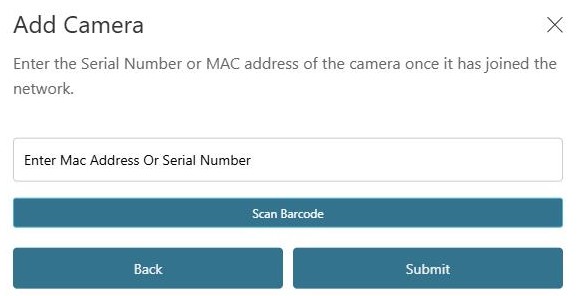
Enter the doorbell MAC Address or UUID Number, then select Submit.
Note: The Mac Address and UUID Number are printed on the box and on the back of the doorbell. The MAC Address can be scanned with a barcode scanner on a mobile device.
-
Wait for the doorbell to be added to the system in Dealer Admin. This may take several minutes. Once added, the doorbell displays in the doorbell settings page.
Option 2: Camera (PoE Connection)
-
Log in to Dealer Admin (dealer.securecomwireless.com).
-
Go to Customers and select the System Name the doorbell is associated with.
-
At Video, go to Video Doorbells and select + Doorbell.
-
Select Hardwired if you are using Ethernet for network connection.
.png?cb=88ca3c51023c2ebad1ecd98ae037d93d)
-
Enter the Mac Address or UUID Number, then select Submit.
Note: The Mac Address and UUID Number are printed on the box and on the back of the doorbell. The MAC Address can be scanned with a barcode scanner on a mobile device.
-
Wait for the doorbell to be added to the system in Dealer Admin. This may take several minutes. Once added, the doorbell displays in the doorbell settings page.
Step 3: Configure Video Doorbell Options
-
Log in to Dealer Admin (dealer.securecomwireless.com).
-
Go to Customers and select the System Name the doorbell is associated with.
-
At Video, go to Video Doorbells and select the doorbell you want to configure options for.
-
At the top of the screen, select Camera Details to view the following camera information:
-
Camera Id
-
Camera Name
-
MAC Address
-
IP Address
-
Serial Number
-
Activation Status
-
Time Zone
-
Daylight Savings Time
-
Last Check In
-
Wireless Signal Strength
-
Firmware Version
-
User Name
-
Password
-
-
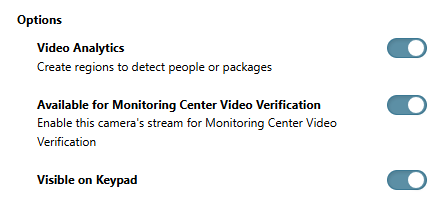
At Options, toggle Video Analytics ON if you want to create regions to detect people, vehicles, or packages.
-
Toggle Available for Monitoring Center Video Verification ON if you want to enable the doorbell’s stream for monitoring center video verification.
Note: If Available for Monitoring Center Video Verification does not display, ensure the feature is enabled. Refer to Enable Monitoring Center Video Verification for more information.
-
Toggle Visible on Keypad if you want the doorbell to be visible on an 8860 7-inch Touchscreen Keypad.
-
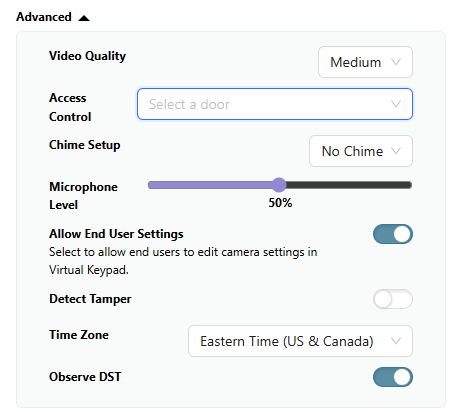
Go to Advanced to configure settings for the following options:
-
In the Video Quality drop-down menu, select Low, Medium, or High to determine the video quality.
-
In the Access Control drop-down menu, select a door you want to associate with the video doorbell.
Note: Ensure a door has been added in panel programming and Door Control has been enabled. For more information about how to enable door control features and add a door as a device, refer to Add a Door as a Device and Enable Door Control.
-
In the Access Control drop-down menu, select a door you want to associate with the video doorbell.
-
In the Chime Setup drop-down menu, select Mechanical if you are using a mechanical chime. Select No Chime if you are not using a chime.
Note: When using the VUE Video Doorbell with a DMP 1108 Doorbell Module, program the
doorbell as a mechanical chime.
-
In Microphone Level, use the slider to adjust the microphone level volume.
-
Toggle Allow End User Settings ON if you want to allow end users to edit doorbell settings in Virtual Keypad. To use end user settings, refer to Virtual Keypad App Help: Use the VUE Video Doorbell or VirtualKeypad.com Help: Use VUE Video Doorbell.
-
Toggle Detect Tamper ON to enable tamper detection.
-
Select the appropriate Time Zone.
-
Toggle Observe DST ON if you want the doorbell to observe Daylight Saving Time.
-
Select Save at the top of the screen or refer to the steps below to create detection regions.
Create Detection Regions and Configure Analytics
Note: You can create up to four regions per doorbell.
-
Log in to Dealer Admin (dealer.securecomwireless.com).
-
Go to Customers and select the System Name the doorbell is associated with.
-
At Video, go to Video Doorbells and select the doorbell you want to configure options for.
-
Go to Regions and Analytics and select + Region. A blue box appears in the middle of the doorbell view screen.
-
Select the box, then drag it across the doorbell view to place it in the desired detection region. Select and drag the white circles on the corners of the box to manipulate the region.
.png?cb=cc17643d0e7eec37490f6ef82987bf2d)
-
At Sensitivity, use the slider to configure the detection sensitivity.
-
Toggle People, Vehicles, Package, or any combination of the three ON if you want the doorbell to detect any of those options.
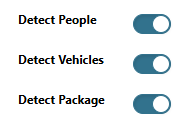
Note: You can only create a detection region for Packages in Region #1.
-
Create another region or select Save at the top of the screen.
Step 4: Add Virtual Keypad App Users
Add Virtual Keypad app users so they can manage the video doorbell, which includes creating regions, viewing video events, and more.
-
Log in to Dealer Admin (dealer.securecomwireless.com)
-
Go to Customers and select the customer’s name associate with the XV Gateway.
-
Go to App Users, then select the Add icon.
-
Enter the user’s Email, First Name, and Last Name.

-
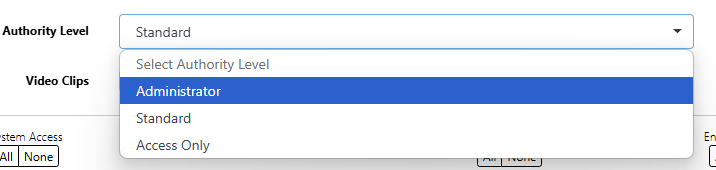
Select one of the following authority levels:
-
Administrator—The user can manage multiple systems.
-
Standard—The user can manage a single system.
-
Access Only—The user has temporary door access.
-
-
If you want to email the user video clips, select the checkbox next to Email Video Clips.
-
Select the systems you want the user to have authority to access.
-
Choose if you want users to be able to View User Codes or Enable Reports. If you want to allow Virtual Keypad users to initiate a system panic from the app and website, enable any of the following options:
-
Police Panic
-
Fire Panic
-
Emergency Panic
-
-
Select Save. After you add an app user in Dealer Admin, the user is sent a welcome email with a link to finish setting up their account by creating a password.
-
Configure additional settings as needed or refer users to Virtual Keypad App Help: Use the VUE Video Doorbell or VirtualKeypad.com Help: Use VUE Video Doorbell to manage the video doorbell on Virtual Keypad.